
Chapter 6 Constructions and Tilings (Class 7 - Latest Maths NCERT (Ganita Prakash II) Solutions)
Seeking detailed, step-by-step NCERT Solutions for Chapter 6: Constructions and Tilings? This page provides comprehensive answers and precise geometric guides for the latest Class 7 Maths curriculum. We walk you through the essential techniques of creating a Perpendicular Bisector using only a compass and an unmarked ruler, ensuring your midpoints are mathematically perfect. Our solutions also connect these modern methods to the historical wisdom of the Śulba-Sūtras, making the logic of geometric alignment easy to grasp.
Our solutions offer clear instructions for Angle Bisection and the art of Copying Angles, which are vital for constructing complex shapes. Whether you are figuring out how to draw an 8-petalled flower or modeling the Trefoil and Pointed Arches of the Red Fort, we provide the step-by-step logic required for success. You will also find detailed explanations on the internal geometry of a Regular Hexagon, demonstrating how six equilateral triangles perfectly tile around a point to complete a $360^\circ$ rotation.
In the Tiling and Tessellation section, we provide solutions for 7-piece Tangram puzzles and use clever strategies—like the black-and-white coloring method—to solve complex tiling challenges. From understanding hexagonal bee hives to the mathematical art of M.C. Escher, these resources are designed to help you verify your constructions and master the patterns of the physical world. Curated by learningspot.co, these Ganita Prakash II solutions ensure you build the precision needed for advanced geometry.
Figure It Out (Page No. 140)
Question 1. When constructing the perpendicular bisector, is it necessary to have the same radius for the arcs above and below $XY$? Explore this through construction, and then justify your answer.
[Hint 1: Any point that is of the same distance from $X$ and $Y$ lies on the perpendicular bisector. Hint 2: We can draw the whole line if any two of its points are known.]
Answer:
To Explore: If different radii can be used for the arcs above and below the line segment $XY$ while constructing a perpendicular bisector.
Solution:
No, it is not necessary to have the same radius for the arcs above and below the line $XY$.
Justification:
To draw a line, we only need to identify any two distinct points on that line. In the construction of a perpendicular bisector, any point that is equidistant from the two endpoints $X$ and $Y$ will lie on the bisector.
If we use a radius $r_1$ to draw arcs from $X$ and $Y$ that intersect at point $P$ above the line, then $PX = PY = r_1$. Thus, $P$ is on the bisector.
If we use a different radius $r_2$ to draw arcs from $X$ and $Y$ that intersect at point $Q$ below the line, then $QX = QY = r_2$. Thus, $Q$ is also on the bisector.
The line passing through $P$ and $Q$ will be the perpendicular bisector of $XY$, even if $r_1 \neq r_2$.
Question 2. Is it necessary to construct the pairs of arcs above and below $XY$? Instead, can we construct both the pairs of arcs on the same side of $XY$? Explore this through construction, and then justify your answer.
Answer:
To Explore: If both pairs of arcs can be constructed on the same side of the line segment $XY$.
Solution:
Yes, it is possible to construct both pairs of intersecting arcs on the same side of $XY$.
Justification:
A straight line is uniquely determined by any two points. If we construct two points $P$ and $Q$ such that both are on the same side of the line segment $XY$, and both points are equidistant from $X$ and $Y$, then both points will lie on the perpendicular bisector.
To do this, we draw the first pair of arcs with a radius $r_1$ to find point $P$. Then, we draw a second pair of arcs with a different radius $r_2$ (much larger or smaller) to find point $Q$ on the same side. Joining $P$ and $Q$ and extending the line will give us the perpendicular bisector of $XY$.
Question 3. While constructing one pair of intersecting arcs, is it necessary that we use the same radii for both of them? Explore this through construction, and then justify your answer.
Answer:
To Explore: If a single pair of arcs must have the same radius.
Solution:
Yes, it is absolutely necessary to use the same radius for both arcs in a single intersecting pair.
Justification:
Let $P$ be the intersection point of two arcs, one centered at $X$ with radius $r_X$ and another centered at $Y$ with radius $r_Y$.
For point $P$ to lie on the perpendicular bisector, it must be equidistant from $X$ and $Y$, which means $PX = PY$.
Since $PX = r_X$ and $PY = r_Y$, the condition $PX = PY$ can only be satisfied if $r_X = r_Y$.
If we use different radii ($r_X \neq r_Y$), the intersection point will be closer to one endpoint than the other, and therefore, it will not lie on the perpendicular bisector of the segment.
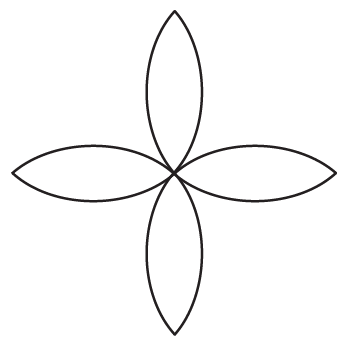
Question 4. Recreate this design using only a ruler and compass —
Answer:
Construction Required: A four-petal floral design using a ruler and compass.
Steps of Construction:
1. Draw a line segment and construct its perpendicular bisector to get two perpendicular lines intersecting at center $O$.
2. Draw a circle with center $O$ and any radius $r$. Let it intersect the perpendicular lines at points $A, B$ (horizontal) and $C, D$ (vertical).
3. Keeping the same radius $r$, place the compass pointer at $A$ and draw an arc passing through $O$ to $C$ and $D$.
4. Repeat the process by placing the pointer at $B$, $C$, and $D$ in turn, drawing arcs that pass through the center $O$.
5. The overlapping arcs will form four petals centered at $O$.
Figure It Out (Page No. 142)
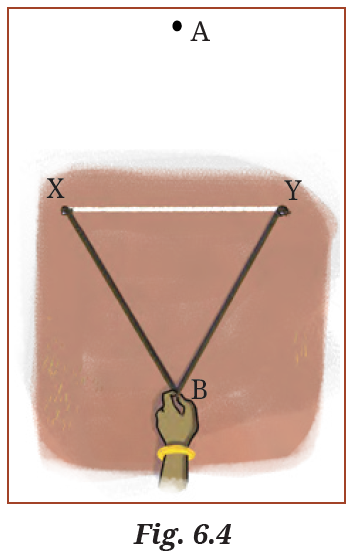
Question 1. Justify why $AB$ in Fig. 6.4 is the perpendicular bisector.
Answer:
Given:
In the given figure, $XAY$ and $XBY$ are two positions of a rope. Points $A$ and $B$ are the midpoints of the rope.
$AX = AY = BX = BY$
(Midpoint of same rope)
To Prove:
$AB$ is the perpendicular bisector of the line segment $XY$.
Proof:
In $\triangle AXB$ and $\triangle AYB$:
$AX = AY$
(Given)
$BX = BY$
(Given)
$AB = AB$
(Common side)
$\therefore \triangle AXB \cong \triangle AYB$ by SSS congruence criterion.
$\angle XAO = \angle YAO$
(CPCT) ... (i)
Now, in $\triangle AXO$ and $\triangle AYO$ (where $O$ is the intersection of $AB$ and $XY$):
$AX = AY$
(Given)
$\angle XAO = \angle YAO$
[From (i)] ... (ii)
$AO = AO$
(Common side)
$\therefore \triangle AXO \cong \triangle AYO$ by SAS congruence criterion.
From the congruence of these triangles, we get:
$OX = OY$
(CPCT)
$\angle XOA = \angle YOA$
(CPCT)
Since $XY$ is a straight line:
$\angle XOA + \angle YOA = 180^\circ$
(Linear pair)
$2\angle XOA = 180^\circ$
($\because \angle XOA = \angle YOA$)
$\angle XOA = 90^\circ$
Since $OX = OY$ (bisecting property) and $\angle XOA = 90^\circ$ (perpendicular property), we can conclude that $AB$ is the perpendicular bisector of $XY$.
Question 2. Can you think of different methods to construct a $90^\circ$ angle at a given point on a line using a rope?
Answer:
Using the 3-4-5 Principle (Pythagorean Triple)
In this construction, we use the principle that if the sides of a triangle are in the ratio $3 : 4 : 5$, then the angle opposite to the longest side ($5$ units) is $90^\circ$. This is a well-known method used since ancient times in India (as seen in the Sulba Sutras) for land measurement and altar construction.
Construction Required:
1. Draw a line $XY$ and take any point $A$ on it where the $90^\circ$ angle is to be constructed.
2. Fix a small pole at point $A$.
3. Take a rope and mark it at $0$ units, $3$ units, $8$ units, and $12$ units.
4. Attach the $0$ unit mark and $12$ unit mark of the rope together at the pole at point $A$.
5. Stretch the rope along the line $XY$ and fix the $3$ unit mark at a point $B$ with another pole.
6. Now, hold the $8$ unit mark of the rope and pull it away from the line $XY$ until both parts of the rope ($BC$ and $AC$) are tight.
7. Place a pole at this point and label it $C$.
Solution:
In $\triangle ABC$, the lengths of the sides are calculated as follows:
$AB = 3 - 0 = 3$ units
... (i)
$BC = 8 - 3 = 5$ units
... (ii)
$AC = 12 - 8 = 4$ units
... (iii)
Here, the longest side is $BC = 5$ units.
According to the 3-4-5 principle:
$3^2 + 4^2 = 9 + 16 = 25 = 5^2$
[Pythagoras Theorem] ... (iv)
The angle opposite to the longest side ($BC$) is $\angle BAC$ (or $\angle A$).
$\therefore \angle BAC = 90^\circ$.
Thus, the line $AC$ is perpendicular to the line $XY$ at the point $A$.
Figure It Out (Page No. 144 - 145)
Question 1. Construct at least 4 different angles. Draw their bisectors.
Answer:
To Construct:
Four different angles ($60^\circ$, $90^\circ$, $120^\circ$, and $180^\circ$) and their respective angle bisectors.
General Steps of Construction:
1. Draw a ray $OA$.
2. Using a protractor or compass, construct the required angle $\angle AOB$.
3. With $O$ as the center and any convenient radius, draw an arc to intersect the rays $OA$ and $OB$ at points $P$ and $Q$ respectively.
4. With $P$ as the center and a radius more than half of $PQ$, draw an arc in the interior of $\angle AOB$.
5. With $Q$ as the center and the same radius, draw another arc to intersect the previous arc at point $C$.
6. Join $OC$. The ray $OC$ is the required angle bisector such that:
$\angle AOC = \angle BOC = \frac{1}{2} \angle AOB$
[Definition of Angle Bisector]
1. Bisecting a $60^\circ$ Angle
When we bisect a $60^\circ$ angle, we obtain two angles of $30^\circ$ each.
$\frac{60^\circ}{2} = 30^\circ$
2. Bisecting a $90^\circ$ Angle
When we bisect a $90^\circ$ (Right) angle, we obtain two angles of $45^\circ$ each.
$\frac{90^\circ}{2} = 45^\circ$
3. Bisecting a $120^\circ$ Angle
When we bisect a $120^\circ$ (Obtuse) angle, we obtain two angles of $60^\circ$ each.
$\frac{120^\circ}{2} = 60^\circ$
4. Bisecting a $180^\circ$ Angle
When we bisect a $180^\circ$ (Straight) angle, we obtain two angles of $90^\circ$ each, which results in a perpendicular line.
$\frac{180^\circ}{2} = 90^\circ$
Conclusion: By following the steps of construction, we can successfully bisect any given angle into two equal parts using a compass and a straightedge.
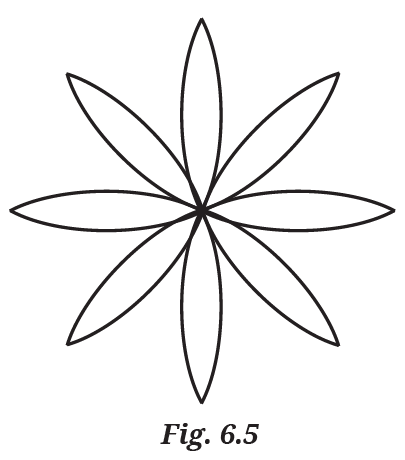
Question 2. Construct the 8-petalled figure shown in Fig. 6.5.
Answer:
To Construct: An $8$-petalled floral figure as shown in Fig. 6.5.
Steps of Construction:
1. Draw a circle with center $O$ and a suitable radius $r$.
2. Draw two diameters that are perpendicular to each other. This divides the circle into $4$ equal parts, intersecting the circumference at $4$ points.
3. Bisect each of the four $90^\circ$ angles formed at the center. This will result in $8$ equally spaced points on the circumference of the circle, each at an angle of $45^\circ$ from the next.
4. Let these $8$ points on the circumference be $P_1, P_2, P_3, P_4, P_5, P_6, P_7,$ and $P_8$.
5. Now, use the original radius $r$ of the circle. Place the compass at each of these $8$ points and draw arcs that pass through the center $O$.
6. The overlapping arcs formed by these $8$ centers will create the $8$-petalled design.
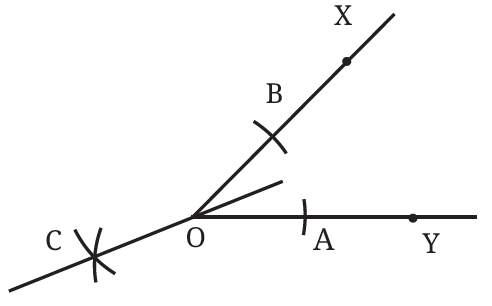
Question 3. In Step 2 of angle bisection, if arcs of equal radius are drawn on the other side, as shown in the figure, will the line $OC$ still be an angle bisector? Explore this through construction, and then justify your answer.
Answer:
To Justify: Whether drawing arcs on the "other side" (opposite to the interior of the angle) results in a line that is still the angle bisector.
Solution:
Yes, the line $OC$ will still be the angle bisector.
Justification:
1. In the figure, points $A$ and $B$ are marked on the two rays such that they are equidistant from the vertex $O$. Hence, $OA = OB$.
2. Arcs of equal radius are drawn from $A$ and $B$, intersecting at point $C$ on the side opposite to the angle. Therefore, $AC = BC$.
3. Consider $\triangle$OAC and $\triangle$OBC:
$OA = OB$
(Points on arcs of same radius from O)
$AC = BC$
(Arcs of equal radius from A and B)
$OC = OC$
(Common side)
4. By the SSS (Side-Side-Side) congruence criterion, $\triangle$OAC $\cong$ $\triangle$OBC.
5. Consequently, $\angle$AOC = $\angle$BOC (by CPCT).
6. Since the angles are equal, the ray $OC$ bisects the "reflex" angle. By extending the line $CO$ through the vertex into the interior of $\angle$XOY, we get the standard angle bisector.
Question 4. What are the other angles that can be constructed using angle bisection? Can you construct $65.5^\circ$ angle?
Answer:
To Find: Other constructible angles and the possibility of constructing a $65.5^\circ$ angle.
Solution:
Angle bisection allows us to construct any angle that is half of a known constructible angle. By repeatedly bisecting standard angles like $90^\circ$, $60^\circ$, and $120^\circ$, we can obtain a wide variety of angles.
1. Angles derived from $90^\circ$:
$\frac{90^\circ}{2} = 45^\circ$
$\frac{45^\circ}{2} = 22.5^\circ$
$\frac{22.5^\circ}{2} = 11.25^\circ$
2. Angles derived from $60^\circ$:
$\frac{60^\circ}{2} = 30^\circ$
$\frac{30^\circ}{2} = 15^\circ$
$\frac{15^\circ}{2} = 7.5^\circ$
We can also construct angles by adding or subtracting these values (e.g., $60^\circ + 15^\circ = 75^\circ$, or $90^\circ + 45^\circ = 135^\circ$).
Regarding $65.5^\circ$ Angle:
To construct an angle of $65.5^\circ$ through bisection, we would need to start from an angle of:
$65.5^\circ \times 2 = 131^\circ$
Since $131^\circ$ is not an angle that can be constructed using a standard ruler and compass, we cannot construct a $65.5^\circ$ angle using standard angle bisection methods.
Question 5. Come up with a method to construct the angle bisector using a rope.
Answer:
Given:
Let $\angle XOY$ be the given angle that needs to be bisected using a rope.
Construction Required:
1. Fix a small pole at the vertex point $O$.
2. Take a rope and make a loop at one end. Mark a point at a fixed distance on the rope to represent a constant radius.
3. Fix the loop of the rope at the pole at $O$ and rotate the rope from ray $OX$ to ray $OY$.
4. Mark points $A$ (on $OX$) and $B$ (on $OY$) where the fixed distance mark on the rope meets the rays.
5. Fix small poles at points $A$ and $B$.
6. Take another piece of rope and make loops on both ends. Fix these loops to the poles at $A$ and $B$.
7. Mark the midpoint of this rope and hold the rope at that midpoint. Pull the rope away from $O$ until both segments of the rope are tight.
8. Label this point as $M$.
9. Join $AM$, $BM$, and $OM$.
Proof / Solution:
In $\triangle OAM$ and $\triangle OBM$:
$OA = OB$
(Distance from $O$ is kept fixed on the rope)
$AM = BM$
(Since $M$ is the midpoint of the second rope)
$OM = OM$
(Common side)
$\therefore \triangle OAM \cong \triangle OBM$ by SSS (Side-Side-Side) congruence rule.
By Corresponding Parts of Congruent Triangles (C.P.C.T.):
$\angle AOM = \angle BOM$
[By C.P.C.T.] ... (i)
Since $\angle AOM$ is part of $\angle XOM$ and $\angle BOM$ is part of $\angle YOM$, we have:
$\angle XOM = \angle YOM$
... (ii)
Thus, $OM$ is the bisector of the given angle $\angle XOY$.
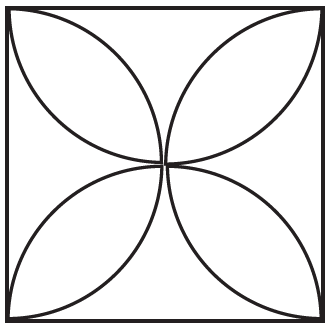
Question 6. Construct the following figure.
How do we construct the petals so that they are of the maximum possible size within a given square?
Answer:
Constructions and Tilings Class 7 Solutions Maths Ganita Prakash Part 2 Chapter 6 Page 144 Q6
To Construct:
A figure containing four petals of maximum possible size within a square.
Construction Required:
1. Step 1 (Constructing the Square): Draw a straight line and mark two points $A$ and $B$ on it. The distance $AB$ will be the side of our square.
2. Using a compass, construct perpendicular lines at point $A$ and point $B$. To do this, draw semicircles at $A$ and $B$ to get points $C, D$ and $E, F$. Draw intersecting arcs from these points to find points $G$ and $H$ respectively.
3. Join $AG$ and $BH$. On these perpendicular lines, mark points $I$ and $J$ such that $AI = BJ = AB$.
4. Join $I$ and $J$ to complete the square $ABJI$.
$AB = BJ = JI = IA$
(Sides of a square)
5. Step 2 (Finding Midpoints): Use a ruler and compass to find the perpendicular bisectors of sides $AB, BJ, JI,$ and $IA$ to locate their midpoints. Let these midpoints be $K, L, M,$ and $N$ respectively.
6. Step 3 (Drawing Petals): With point $K$ (midpoint of $AB$) as the center and $AK$ as the radius, draw a semicircle inside the square.
$Radius = AK = \frac{1}{2} AB$
[Half the side of square]
7. Repeat this process by drawing semicircles with centers at $L, M,$ and $N$ inside the square, all with the same radius equal to half the side of the square.
8. Step 4 (Finishing): Erase any extra construction lines and arcs to reveal the four-petal design.
Observation and Conclusion:
The petals are formed by the overlapping regions of the four semicircles. To ensure the petals are of maximum possible size, we must ensure that:
1. The diameter of each semicircle is equal to the side of the square.
2. The semicircles are drawn using the midpoints of the sides of the square as centers.
Because each semicircle spans the full width or height of the square, the resulting petals occupy the maximum available space within the boundary of the square.
Final Figure:
Figure It Out (Page No. 147)
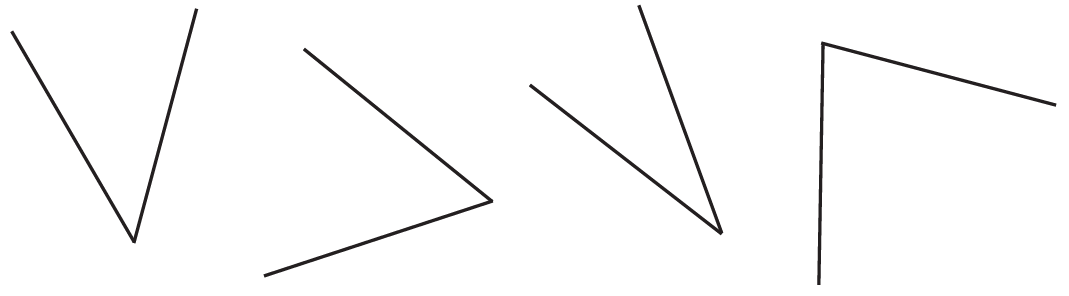
Question 1. Construct at least 4 different angles in different orientations without taking any measurement. Make a copy of all these angles.
Answer:
Constructions and Tilings Class 7 Solutions Maths Ganita Prakash Part 2 Chapter 6 Page 147 Q1
To Construct: Four different angles in various orientations and creating their exact copies using a ruler and compass (without numerical measurement).
1. Copying Angle (i): $\angle ABC$
Step 1: Draw a ray $B'C'$ in the desired direction for the new angle.
Step 2: With vertex $B$ of the original angle as center and any radius, draw an arc intersecting $BA$ at $M$ and $BC$ at $N$.
Step 3: Using the same radius, draw an arc from $B'$ intersecting $B'C'$ at $N'$.
Step 4: Measure the distance $MN$ using the compass. From $N'$, draw an arc of radius $MN$ to cut the previous arc at $M'$. Join $B'M'$.
$MN = M'N'$
[Arc width transferred]
2. Copying Angle (ii): $\angle DEF$
Step 1: Draw a ray $E'F'$ along the required orientation. With $E$ as center, draw an arc cutting $ED$ and $EF$ at $O$ and $P$.
Step 2: With $E'$ as center and the same radius, draw an arc cutting $E'F'$ at $P'$. Transfer length $OP$ to the new arc to find $O'$. Join $E'O'$.
$\angle D'E'F' = \angle DEF$
(By Construction)
3. Copying Angle (iii): $\angle GHI$
Step 1: At vertex $H$, draw an arc intersecting $HG$ and $HI$ at $Q$ and $R$. This defines the angular spread.
Step 2: Draw ray $H'I'$. Repeat the arc from $H'$ with the same radius to find $R'$. Mark $Q'$ such that $R'Q' = RQ$. Draw ray $H'G'$.
$QR = Q'R'$
[Linear distance of arc]
4. Copying Angle (iv): $\angle JKL$
Step 1: With $K$ as center, draw an arc intersecting $KJ$ and $KL$ at $S$ and $T$.
Step 2: Draw ray $K'L'$. With $K'$ as center and the same radius as before, draw an arc cutting $K'L'$ at $T'$. Mark $S'$ on the arc so $T'S' = TS$. Join $K'S'$.
$\angle J'K'L' = \angle JKL$
(Corresponding angles are equal)
Note: In all these constructions, the compass setting used for the first arc must remain unchanged when drawing the second arc at the new vertex. This ensures the radial distance is preserved before transferring the chord length ($MN, OP, QR, ST$).
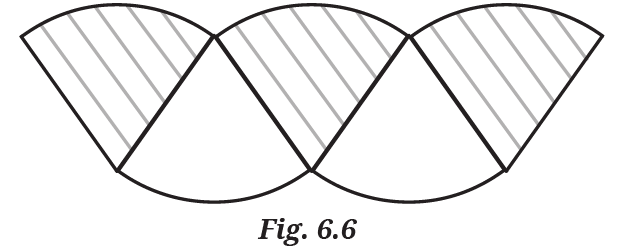
Question 2. Construct the Fig. 6.6.
Answer:
Given:
A pattern of connected circular sectors as shown in Figure 6.6. Let the vertices of the original figure be labeled as $A, B, C, D, E, F,$ and $G$ for reference during construction.
To Construct:
An exact replica of the pattern using a ruler and a compass without numerical measurement.
Construction Procedure:
1. Constructing the first shaded sector:
Draw a straight line and mark a segment $A'B'$ equal in length and direction to the original segment $AB$.
$A'B' = AB$
[Measured using compass]
With $B'$ as the center, draw an arc with radius $A'B'$. Measure the distance $AC$ from the original figure with a compass and transfer it to this arc from $A'$ to find point $C'$.
$A'C' = AC$
(Chord length of the arc)
Join $B'C'$ and shade the sector $A'B'C'$ as shown in the original figure.
2. Constructing the first unshaded part:
With $C'$ as the center, draw an arc of radius $B'C'$. Measure the distance $BD$ from the original figure and transfer it onto this arc from $B'$ to find point $D'$. Join $C'$ and $D'$.
$B'D' = BD$
[Copying the next vertex]
3. Constructing the second shaded sector:
With $D'$ as the center, draw an arc of radius $C'D'$. Measure the distance $CE$ and transfer it to the arc from $C'$ to get point $E'$. Join $D'E'$ and shade this sector.
$C'E' = CE$
(Corresponding distance)
4. Constructing the second unshaded part:
With $E'$ as the center, draw an arc of radius $D'E'$. Measure distance $DF$ and transfer it from $D'$ to find point $F'$. Join $E'F'$.
$D'F' = DF$
[Distance between vertices]
5. Constructing the third shaded sector:
With $F'$ as the center, draw an arc of radius $E'F'$. Measure the distance $EG$ and transfer it from $E'$ to find point $G'$. Join $F'G'$ and shade this final sector.
$E'G' = EG$
(Final sector measurement)
Final Step:
Erase any extra construction arcs to obtain the required figure. The final construction will be a series of three shaded sectors and two unshaded connecting parts, perfectly mimicking the proportions of the original Figure 6.6.
Figure It Out (Page No. 148)
Question 1. Construct $4$ pairs of parallel lines in different orientations.
Answer:
To Construct: Four pairs of parallel lines in various orientations (horizontal, vertical, and slanted).
Construction Method (Using Corresponding Angles):
To construct a line parallel to a given line $l$ passing through a point $P$ not on it:
1. Draw a line $l$ and a point $P$ outside it.
2. Take any point $Q$ on line $l$ and join $PQ$.
3. With $Q$ as the center and any radius, draw an arc intersecting $l$ at $X$ and $PQ$ at $Y$.
4. With $P$ as the center and the same radius, draw an arc intersecting the ray $PQ$ at $R$.
5. Adjust the compass to the length of the arc $XY$.
6. With $R$ as the center, draw an arc intersecting the previous arc at $S$.
7. Draw a line $m$ passing through $P$ and $S$. The line $m$ is parallel to line $l$.
Orientations:
By repeating this process while rotating the paper or the initial line $l$, we can create $4$ pairs:
1. Horizontal Pair: Lines running left to right.
2. Vertical Pair: Lines running up and down.
3. Slanted (Left-to-Right): Lines at an angle of approximately $45^\circ$.
4. Slanted (Right-to-Left): Lines at an angle of approximately $135^\circ$.
Question 2. Construct the following figure.
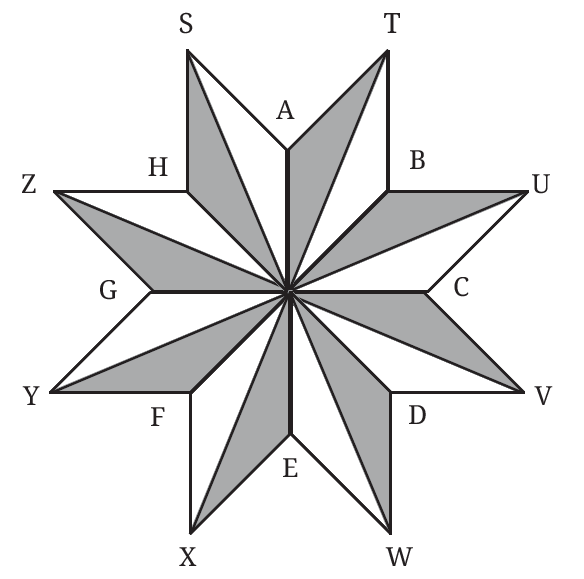
Answer:
Constructions and Tilings Class 7 Solutions Maths Ganita Prakash Part 2 Chapter 6 Page 148 Q2
To Construct:
A geometric figure consisting of 8 identical rhombuses arranged around a central vertex to form a star shape.
To Find:
The measure of the acute angle of each rhombus at the center.
$\text{Angle at center} = \frac{360^\circ}{8} = 45^\circ$
[Total angle around a point]
Construction Required:
1. Step 1: Draw a horizontal line and mark a point $A$ on it. This point will be the central vertex of the star.
2. Step 2: With $A$ as the center, draw a semicircle. From the endpoints $B$ and $C$ of the diameter on the line, draw arcs of equal radius to intersect at point $D$. Join $AD$ to construct a $90^\circ$ angle ($\angle CAD = 90^\circ$).
3. Step 3: Construct the bisector of $\angle CAD$. With centers at $C$ and the point where $AD$ meets the semicircle (let's call it $E$), draw arcs of equal radius. Let them intersect at $F$. Join $AF$. Now, $\angle CAF = 45^\circ$.
4. Step 4: With $A$ as the center and a fixed radius, draw an arc intersecting $AC$ and $AF$ at points $G$ and $H$ respectively.
5. Step 5: Keeping the same radius, draw two arcs—one with center $G$ and one with center $H$. Let these arcs intersect at point $I$. Join $AI$. The figure $AGIH$ is a rhombus with a $45^\circ$ base angle.
Solution:
1. Erase the construction arcs. Shade or color the upper triangle $AHI$ of the rhombus as per the given design.
2. Using tracing paper or by repeating the construction of $45^\circ$ angles, create 8 identical replicas of this rhombus.
3. Place these 8 units side-by-side around the central point $A$. Since each has an angle of $45^\circ$, they will perfectly complete a full circle ($8 \times 45^\circ = 360^\circ$).
4. The final arrangement forms the required star-shaped figure shown in the question.
Final Figure:
Figure It Out (Page No. 151)
Question 1. Use support lines in Fig. $6.11$ to construct a pointed arch. Make different arches, by changing the radius of the arcs.
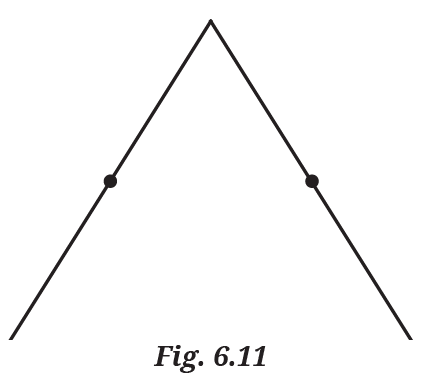
Answer:
To Construct: A pointed arch (Gothic arch) using the support lines provided in Fig. 6.11.
Solution:
A pointed arch is formed by the intersection of two circular arcs. The "pointiness" of the arch depends on the radius used relative to the span (width) of the arch.
Steps of Construction:
1. Identify the two base points on the horizontal support line, let's call them $X$ and $Y$. The distance $XY$ is the span of your arch.
2. Place the compass pointer at point $X$. Adjust the radius to a length $r$. To make the arcs meet at the top, the radius $r$ must be greater than half of the distance $XY$.
3. Draw an arc starting from $Y$ (or a point near it) upwards towards the center.
4. Without changing the radius $r$, move the compass pointer to point $Y$.
5. Draw another arc starting from $X$ (or a point near it) upwards to intersect the first arc at a point $P$.
6. The two arcs meeting at point $P$ form the pointed arch.
Changing the Radius:
1. Equilateral Arch: If you set the radius $r$ exactly equal to the span $XY$ ($r = XY$), you get a perfectly balanced arch where the centers are the opposite corners.
2. Lancet Arch: If you choose a radius $r$ that is much larger than the span $XY$ ($r > XY$), the arch will be much taller and narrower.
3. Drop Arch: If the radius $r$ is smaller than the span ($XY > r > \frac{XY}{2}$), the arch will appear flatter and less pointed.
Question 2. Make your own arch designs.
Answer:
There are several types of arches used in Indian Architecture, ranging from ancient cave temples to medieval monuments. Below are three designs you can construct using a ruler and compass:
1. Semicircular Arch (Roman Arch):
This is a classic design where the arch is a simple half-circle. To construct this, find the midpoint $O$ of your span $XY$. Place the compass at $O$ with radius $r = \frac{XY}{2}$ and draw a semicircle from $X$ to $Y$. This design is common in many colonial-era buildings in India.
2. Ogee Arch:
This arch is very popular in Indo-Islamic architecture, such as the arches seen in the Taj Mahal. It consists of two curves that flow into each other, creating an "S" shape. You can construct this by combining a larger arc at the bottom with a smaller, inverted arc near the peak.
3. Trefoil Arch:
A trefoil arch incorporates the shape of three overlapping leaves (clover-like). It is constructed by drawing three small overlapping circles or semicircles whose centers are arranged in a triangular pattern. This design is often found in decorative windows and religious structures.
Construction Tip: You can combine these methods. For example, you can place a small ogee curve at the top of a standard pointed arch to create a more decorative Tudor-style arch.
Figure It Out (Page No. 154 - 155)
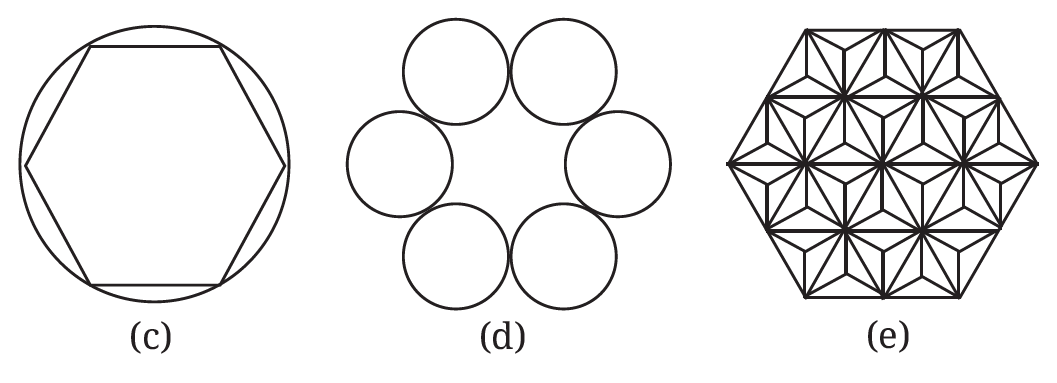
Question 1. Construct the following figures:
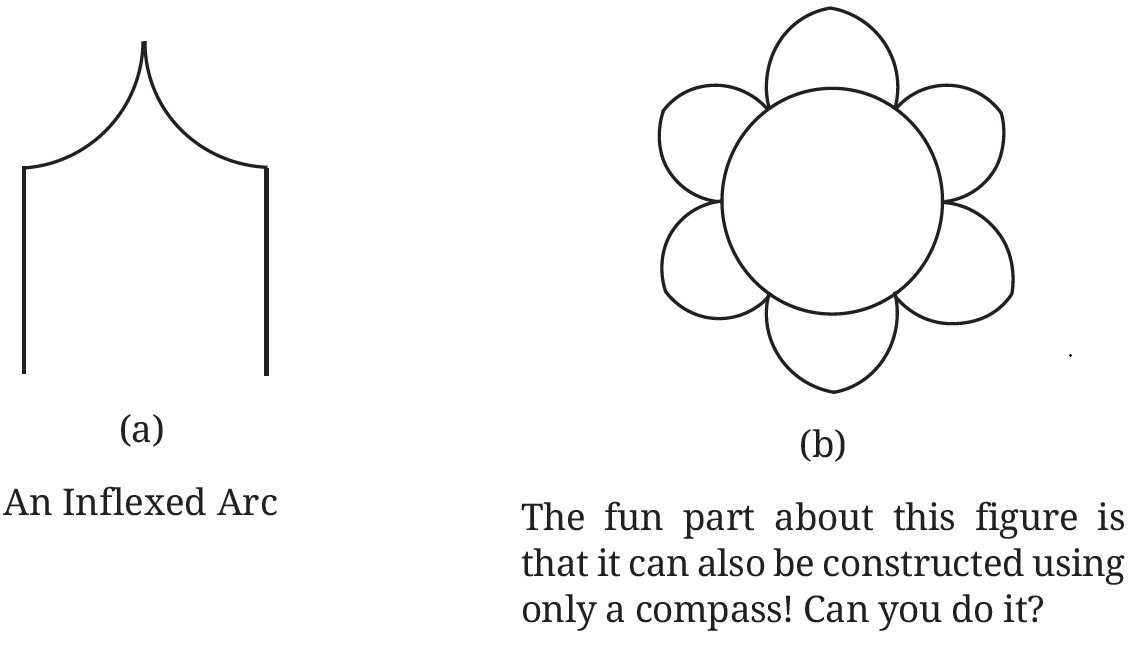
Answer:
(a) Construction of an Inflexed Arc (Ogee Arc)
Construction Required: To construct a symmetrical pointed arc with reverse curves.
Steps of Construction:
1. Draw two vertical parallel lines of equal height and a horizontal base.
2. Connect the top endpoints of the vertical lines with a horizontal support line and find its midpoint to determine the central axis.
3. Divide the space between a vertical line and the center into two equal parts. Use a compass to draw a concave arc from the top of the vertical line and a convex arc that meets at the peak on the central axis.
4. Repeat the same on the other side to complete the Inflexed Arc.
(b) Construction of a Six-Petalled Flower
Construction Required: To construct a central circle surrounded by six circular petals using only a compass.
Steps of Construction:
1. Draw a central circle with any radius $r$ and center $O$.
2. Keep the compass set to the same radius $r$. Place the pointer anywhere on the circumference of the circle and draw a full circle (or a large arc).
3. Move the pointer to the point where the new circle intersects the original central circle. Draw another circle.
4. Continue moving the pointer to each new intersection point around the central circle until you have drawn six outer circles.
5. The overlapping arcs in the center will form the flower design shown in the figure.
(c) Construction of a Regular Hexagon Inscribed in a Circle
Construction Required: To draw a six-sided regular polygon inside a circle.
Steps of Construction:
1. Draw a circle with center $O$ and radius $r$.
2. Keeping the same radius $r$, place the compass pointer on the circumference and mark an arc. Move the pointer to this new mark and repeat until you have six equally spaced points on the circumference.
3. Use a ruler to join these six points in sequence. The resulting figure is a Regular Hexagon.
(d) Construction of Six Tangent Circles
Construction Required: To arrange six circles in a ring such that each is tangent to its neighbours.
Steps of Construction:
1. Construct a regular hexagon as described in part (c).
2. Find the midpoints of each side of the hexagon.
3. Set the compass radius to half the side length of the hexagon.
4. Draw six circles, using each vertex of the hexagon as a center. These circles will touch each other at the midpoints of the hexagon's sides.
(e) Construction of a Triangular Tessellation Pattern
Construction Required: To create a complex geometric pattern based on equilateral triangles.
Steps of Construction:
1. Draw a large regular hexagon.
2. Divide the hexagon into six large equilateral triangles by connecting opposite vertices through the center.
3. Further divide each large triangle into smaller equilateral triangles by connecting the midpoints of the sides.
4. Draw internal lines to create the "star-like" or "3D-cube" effect as shown in the pattern.
Question 2. Optical Illusion: Do you notice anything interesting about the following figure? How does this happen? Recreate this in your notebook.

Answer:
Observation:
In the given figure, we can clearly see a bright white equilateral triangle in the center, pointing downwards. This triangle appears to be "sitting on top" of three black circles and another triangle with a black border. However, if you look closely, there are no actual lines or boundaries drawn for this central white triangle.
Why it happens:
This is a famous optical illusion known as the Kanizsa Triangle. It happens because of a psychological phenomenon called "Illusory Contours."
1. Our brain is wired to recognize familiar shapes and patterns. When it sees the "V" shapes and the gaps in the black circles (which look like "Pac-Man" figures), it tries to make sense of the empty space.
2. To create a logical explanation for the gaps, the brain "fills in" the missing lines and perceives a solid white triangle that is occluding (covering) the other shapes.
3. The perceived white triangle often appears even brighter than the surrounding white background, even though the color is identical.
To Recreate:
1. Use a compass to draw an equilateral triangle with a thin black border.
2. Draw three black circles at the vertices of the triangle.
3. Erase the corners of the triangle and the segments of the circles that fall inside the "path" of the imaginary central triangle.
4. Draw three inverted "V" shapes at the midpoints of the sides of the imaginary triangle to enhance the effect.
Question 3. Construct this figure.
[Hint: Find the angles in this figure.]
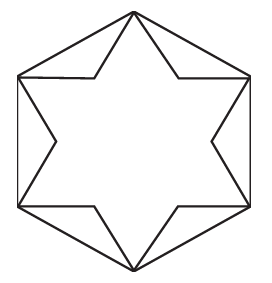
Answer:
Given:
A geometric design consisting of a 6-pointed star (hexagram) inscribed within a regular hexagon.
Analysis of Angles:
1. In a regular hexagon, the number of sides $n = 6$. The sum of interior angles is $(n - 2) \times 180^\circ = 4 \times 180^\circ = 720^\circ$.
2. Each interior angle of the hexagon is $\frac{720^\circ}{6} = 120^\circ$.
3. The 6-pointed star is formed by two overlapping equilateral triangles. Each interior angle of these triangles is $60^\circ$.
Construction Required:
To construct the regular hexagon and the star using only a ruler and a compass.
Steps of Construction:
1. Draw a circle of any convenient radius with center $O$.
2. Keep the compass at the same radius. Place the pointer at any point on the circumference and mark an arc to get point $1$. Move the pointer to point $1$ and mark another arc to get point $2$.
3. Continue this process to get points $3, 4, 5,$ and $6$ on the circumference. Since the radius is equal to the side of a regular hexagon, you will have exactly $6$ points.
4. Join these points in order ($1-2-3-4-5-6-1$) to form the regular hexagon.
5. To form the 6-pointed star, join the alternating vertices: join $1, 3,$ and $5$ to form the first equilateral triangle, and join $2, 4,$ and $6$ to form the second equilateral triangle.
Question 4. Draw a line $l$ and mark a point $P$ anywhere outside the line. Construct a perpendicular to the given line $l$ through $P$.
[Hint: Find a line segment on $l$ whose perpendicular bisector passes through $P$.]
Answer:
Given:
A line $l$ and a point $P$ lying outside the line.
To Construct:
A line passing through point $P$ that is perpendicular to line $l$.
Construction Required:
Using a compass to identify a segment on line $l$ such that $P$ is equidistant from its endpoints.
Steps of Construction:
1. Place the compass pointer at point $P$.
2. Adjust the compass radius so that it is large enough to intersect line $l$. Draw an arc that cuts line $l$ at two distinct points. Let these points be $A$ and $B$.
$PA = PB$
(Arcs of the same radius from P)
3. Now, $P$ lies on the perpendicular bisector of the segment $AB$. We need to find one more point to draw the line.
4. Using the same radius (or any radius greater than half of $AB$), place the compass pointer at point $A$ and draw an arc on the side opposite to point $P$.
5. Without changing the radius, place the pointer at point $B$ and draw another arc that intersects the previous arc at point $Q$.
6. Join the points $P$ and $Q$ with a ruler. Let the line $PQ$ intersect line $l$ at point $M$.
Result:
The line $PQ$ is the required perpendicular to line $l$ passing through point $P$. The angle formed at the intersection is $90^\circ$ ($\angle PMA = 90^\circ$).
Figure It Out (Page No. 156)
Question. How can the tangram pieces be rearranged to form each of the following figures?
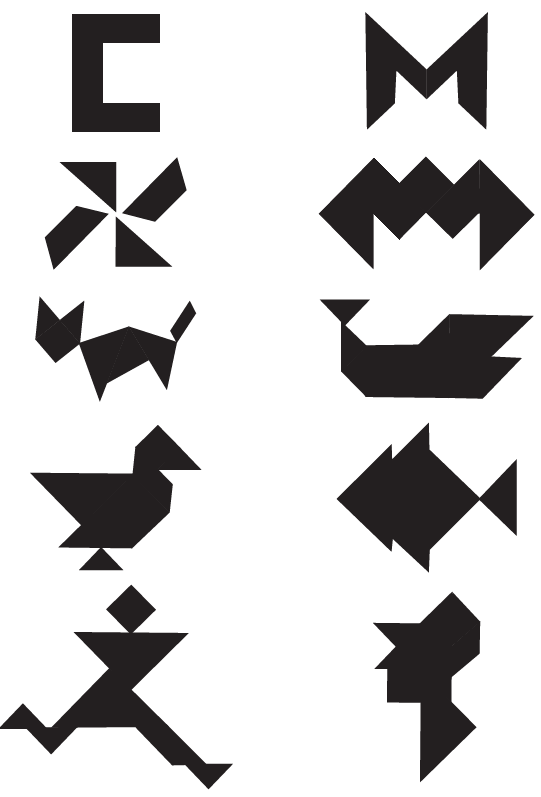
Answer:
Given:
A set of standard tangram pieces and several silhouettes representing animals, humans, and letters.
To Find:
The method to rearrange the $7$ tangram pieces (tans) to match the provided shapes.
Solution:
A standard tangram set consists of $7$ specific geometric shapes. To form the figures shown in the image, we must follow two primary rules:
1. All $7$ pieces must be used for every figure.
2. The pieces must touch but not overlap.
Identification of the $7$ Pieces:
Before rearranging, we must identify the available shapes:
$\bullet$ $2$ large isosceles right-angled triangles.
$\bullet$ $1$ medium isosceles right-angled triangle.
$\bullet$ $2$ small isosceles right-angled triangles.
$\bullet$ $1$ small square.
$\bullet$ $1$ parallelogram.
General Rearrangement Strategy:
To recreate the silhouettes like the cat, bird, or the running person, follow these logical steps:
1. Identify the Head: In many animal and human figures (like the cat or the runner), the square is often used to represent the head.
2. Form the Largest Mass: The two large triangles usually form the bulk of the torso or the largest part of the figure. For example, in the duck/bird silhouette, they form the body.
3. Use the Parallelogram for Limbs or Tails: The parallelogram is unique because it can be flipped. It often forms a tail (like in the cat) or an extended leg (like in the running person).
4. Small Triangles for Details: The small triangles are used for pointed features like ears, feet, or beaks.
5. Filling the Gaps: The medium triangle is used to bridge the connection between the large body parts and the smaller limbs.
Analysis of Specific Shapes:
$\bullet$ The Letter 'C': The pieces are arranged in a block-like rectangular formation to create the three segments of the letter.
$\bullet$ The Running Person: The square forms the head, a large triangle forms the torso, and the parallelogram and other triangles are extended to represent the dynamic motion of the legs and arms.
$\bullet$ The Fish: The large triangles form the main body, while the smaller triangles and parallelogram form the fins and tail.
Educational Note: In the Indian Perspective, tangrams are used as a creative mathematical tool to improve spatial reasoning and understanding of 2D geometry and area conservation.
Figure It Out (Page No. 160)
Question. Are the following tilings possible?
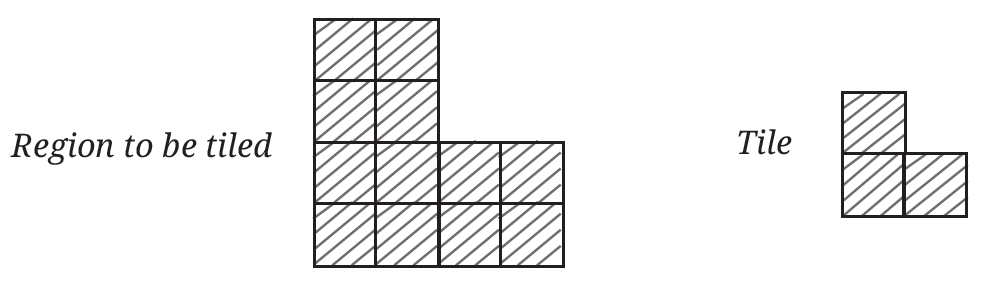
1. Region to be tiled
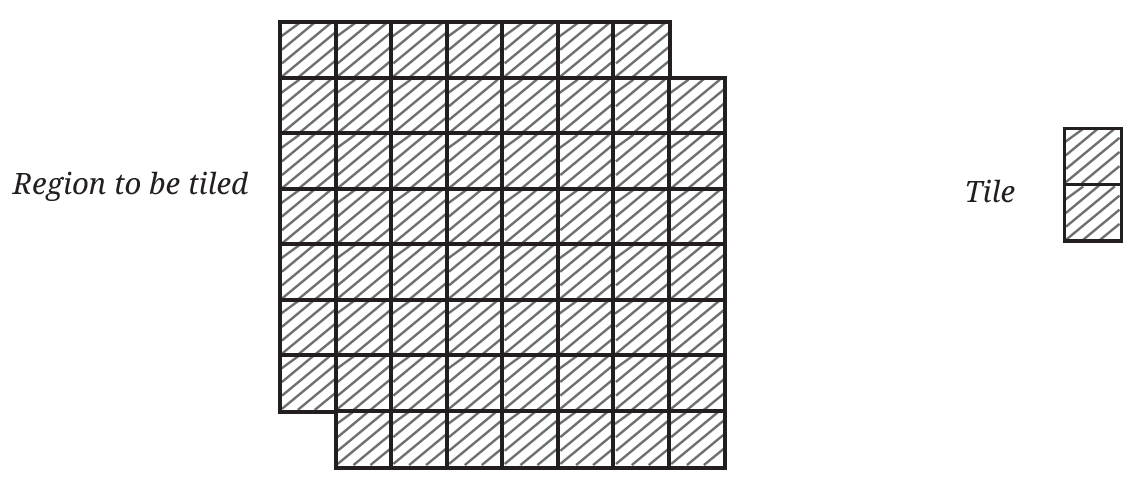
2. Region to be tiled
Answer:
1. Analysis of the first tiling problem:
Given:
A region consisting of unit squares and an L-shaped tile (tromino) made of $3$ unit squares.
To Find:
Whether the given region can be completely covered (tiled) using the L-shaped tile without any gaps or overlaps.
Solution:
First, let us calculate the total area of the region by counting the number of unit squares:
$\bullet$ The bottom rectangular part has a width of $4$ units and a height of $2$ units. Area = $4 \times 2 = 8$ units.
$\bullet$ The top part has a width of $2$ units and a height of $2$ units. Area = $2 \times 2 = 4$ units.
$\text{Total Area of the Region} = 8 + 4 = 12 \text{ units}$
The area of a single tile is $3$ units. To check for divisibility:
$\text{Number of tiles required} = \frac{12}{3} = 4$
Since the area is perfectly divisible, we check the physical fit. Two L-tiles can be joined to form a $2 \times 3$ rectangle. The region can be visualized as two such $2 \times 3$ blocks. Therefore, the tiling is possible.
2. Analysis of the second tiling problem:
Given:
A staggered grid region and a domino-shaped tile (made of $2$ unit squares).
To Find:
Whether the given region can be tiled using the $1 \times 2$ domino tile.
Solution:
A tiling with dominoes is possible if two conditions are met: the total area must be even, and if colored like a checkerboard, the number of black squares must equal the number of white squares.
Let us count the squares in the region:
$\bullet$ The top $7$ rows contain $8$ squares each: $7 \times 8 = 56$ squares.
$\bullet$ The bottom-most row also contains $8$ squares (shifted by one position).
$\text{Total Area} = 56 + 8 = 64 \text{ squares}$
Since $64$ is an even number, the area condition is satisfied. Furthermore, in any continuous grid where we have not removed specific "mutilated" corners of the same color, a checkerboard pattern will yield an equal number of black and white squares ($32$ each). In this specific staggered shape, every domino will always cover one black and one white square. Since the counts are equal, the tiling is possible.
Indian Perspective:
In India, such geometric arrangements are frequently seen in traditional floorings (called Farsh) and Jaali work. The principle used here is the conservation of area and the symmetry of repeating patterns, which is a fundamental concept in Indian architectural geometry.